From outlets to actions: creating an IBAction
I said we'd return to Interface Builder, and now the time has come: we're going to connect the "tap" action of our UIButtons to some code. So, select Main.storyboard, then change to the assistant editor so you can see the code alongside the layout.
Warning: please read the following text very carefully. In my haste I screw this up all the time, and I don't want it to confuse you!
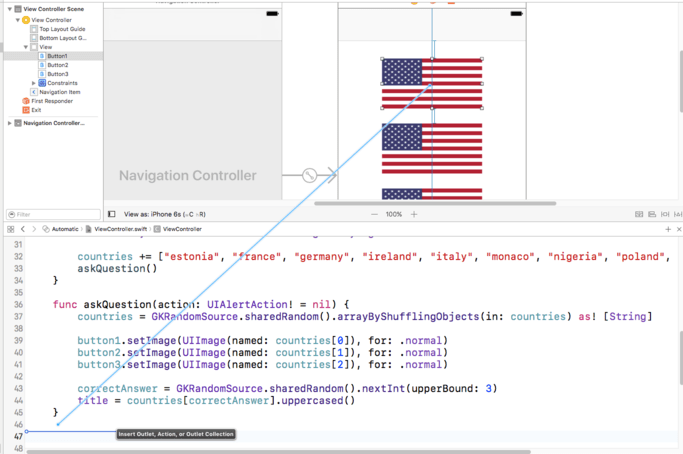
Select the first button, then Ctrl+drag from it down to the space in your code immediately after the end of the askQuestion() method. If you're doing it correctly, you should see a tooltip saying, "Insert Outlet, Action, or Outlet Collection." When you let go, you'll see the same popup you normally see when creating outlets, but here's the catch: don't choose outlet.
That's right: where it says "Connection: Outlet" at the top of the popup, I want you to change that to be “Action”. If you choose Outlet here (which I do all too often because I'm in a rush), you'll cause problems for yourself!
When you choose Action rather than Outlet, the popup changes a little. You'll still get asked for a name, but now you'll see an Event field, and the Type field has changed from UIButton to Any. Please change Type back to UIButton, then enter buttonTapped for the name, and click Connect.
Here's what Xcode will write for you:
@IBAction func buttonTapped(_ sender: UIButton) {
}
…and again, notice the gray circle with a ring around it on the left, signifying this has a connection in Interface Builder.
Before we look at what this is doing, I want you to make two more connections. This time it's a bit different, because we're connecting the other two flag buttons to the same buttonTapped() method. To do that, select each of the remaining two buttons, then Ctrl-drag onto the buttonTapped() method that was just created. The whole method will turn blue signifying that it's going to be connected, so you can just let go to make it happen. If the method flashes after you let go, it means the connection was made.
So, what do we have? Well, we have a single method called buttonTapped(), which is connected to all three UIButtons. The event used for the attachment is called TouchUpInside, which is the iOS way of saying, "the user touched this button, then released their finger while they were still over it" – i.e., the button was tapped.
Again, Xcode has inserted an attribute to the start of this line so it knows that this is relevant to Interface Builder, and this time it's @IBAction. @IBAction is similar to @IBOutlet, but goes the other way: @IBOutlet is a way of connecting code to storyboard layouts, and @IBAction is a way of making storyboard layouts trigger code.
This method takes one parameter, called sender. It's of type UIButton because we know that's what will be calling the method. And this is important: all three buttons are calling the same method, so it's important we know which button was tapped so we can judge whether the answer was correct.
But how do we know whether the correct button was tapped? Right now, all the buttons look the same, but behind the scenes all views have a special identifying number that we can set, called its Tag. This can be any number you want, so we're going to give our buttons the numbers 0, 1 and 2. This isn't a coincidence: our code is already set to put flags 0, 1 and 2 into those buttons, so if we give them the same tags we know exactly what flag was tapped.
Select the second flag (not the first one!), then look in the attributes inspector (Alt+Cmd+4) for the input box marked Tag. You might need to scroll down, because UIButtons have lots of properties to work with! Once you find it (it's about two-thirds of the way down, just above the color and alpha properties), make sure it's set to 1.
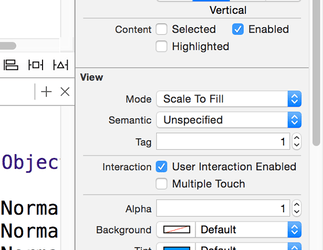
Now choose the third flag and set its tag to be 2. We don't need to change the tag of the first flag because 0 is the default.
We're done with Interface Builder for now, so go back to the standard editor and select ViewController.swift – it's time to finish up by filling in the contents of the buttonTapped() method.
This method needs to do three things:
- Check whether the answer was correct.
- Adjust the player's score up or down.
- Show a message telling them what their new score is.
The first task is quite simple, because each button has a tag matching its position in the array, and we stored the position of the correct answer in the correctAnswer variable. So, the answer is correct if sender.tag is equal to correctAnswer.
The second task is also simple, because you've already met the += operator that adds to a value. We'll be using that and its counterpart, -=, to add or subtract score as needed. The third task is more complicated, so we're going to come to it in a minute.
Put this code into the buttonTapped() method:
var title: String

if sender.tag == correctAnswer {
    title = "Correct"
    score += 1
} else {
    title = "Wrong"
    score -= 1
}
Now for the tough bit: we're going to use a new data type called UIAlertController(). This is used to show an alert with options to the user. To make this work you're going to need to use a closure – something you’ve learned about in theory, but at last finally get to use in practice.
If you remember, closures is a special kind of code block that can be used like a variable – Swift literally takes a copy of the block of code so that it can be called later. Swift also copies anything referenced inside the code, so you need to be careful how you use them. We're going to be using closures extensively later, but for now we’ll take two shortcuts.
Enter this just before the end of the buttonTapped() method:
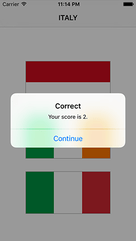
let ac = UIAlertController(title: title, message: "Your score is \(score).", preferredStyle: .alert)
ac.addAction(UIAlertAction(title: "Continue", style: .default, handler: askQuestion))
present(ac, animated: true)
That code will produce an error for a moment, but that’s OK.
The title variable was set in our if statement to be either "correct" or "wrong", and you've already learned about string interpolation, so the first new thing there is the .alert parameter being used for preferredStyle. UIAlertController() gives us two kinds of style: .alert, which pops up a message box over the center of the screen, and .actionSheet, which slides options up from the bottom. They are similar, but Apple recommends you use .alert when telling users about a situation change, and .actionSheet when asking them to choose from a set of options.
The second line uses the UIAlertAction data type to add a button to the alert that says "Continue", and gives it the style “default". There are three possible styles: .default, .cancel, and .destructive. What these look like depends on iOS, but it's important you use them appropriately because they provide subtle user interface hints to users.
The sting in the tail is at the end of that line: handler: askQuestion. The handler parameter is looking for a closure, which is some code that it can execute when the button is tapped. You can write custom code in there if you want, but in our case we want the game to continue when the button is tapped, so we pass in askQuestion so that iOS will call our askQuestion() method.
Warning: We must use askQuestion and not askQuestion(). If you use the former, it means "here's the name of the method to run," but if you use the latter it means "run the askQuestion() method now, and it will tell you the name of the method to run."
There are many good reasons to use closures, but in the example here just passing in askQuestion is a neat shortcut – although it does break something that we'll need to fix in a moment.
The final line calls present(), which takes two parameters: a view controller to present and whether to animate the presentation. It has an optional third parameter that is another closure that should be executed when the presentation animation has finished, but we don’t need it here. We send our UIAlertController for the first parameter, and true for the second because animation is always nice.
Before the code completes, there's a problem, and Xcode is probably telling you what it is: “Cannot convert value of type ‘() -> ()’ to expected argument type ‘((UIAlertAction) -> Void)?’.”
This is a good example of Swift's terrible error messages, and it's something I'm afraid you'll have to get used to. What it means to say is that using a method for this closure is fine, but Swift wants the method to accept a UIAlertAction parameter saying which UIAlertAction was tapped.
To make this problem go away, we need to change the way the askQuestion() method is defined. So, scroll up and change askQuestion() from this:
func askQuestion() {…to this:
func askQuestion(action: UIAlertAction!) {That will fix the UIAlertAction error. However, it will introduce another problem: when the app first runs, we call askQuestion() inside viewDidLoad(), and we don't pass it a parameter. There are two ways to fix this:
- When using
askQuestion()inviewDidLoad(), we could send it the parameternilto mean "there is noUIAlertActionfor this." - We could redefine
askQuestion()so that the action has a default parameter ofnil, meaning that if it isn't specified it automatically becomesnil.
There's no right or wrong answer here, so I'll show you both and you can choose. If you want to go with the first option, change the askQuestion() call in viewDidLoad() to this:
askQuestion(action: nil)And if you want to go with the second option, change the askQuestion() method definition to this:
func askQuestion(action: UIAlertAction! = nil) {Now, go ahead and run your program in the simulator, because it's done!
TAKE YOUR SKILLS TO THE NEXT LEVEL If you like Hacking with Swift, you'll love Hacking with Swift+ – it's my premium service where you can learn advanced Swift and SwiftUI, functional programming, algorithms, and more. Plus it comes with stacks of benefits, including monthly live streams, downloadable projects, a 20% discount on all books, and free gifts!
Sponsor Hacking with Swift and reach the world's largest Swift community!


