How to create a random terrain tile map using SKTileMapNode and GKPerlinNoiseSource
Swift version: 5.6
Tile maps are designed to enable extremely efficient drawing of large amounts of terrain, and work by building grids of smaller images that combine to form large and varied maps. Helpfully, SpriteKit automatically manages the tiles to keep their overhead as low as possible, and even builds a tile map editor directly into Xcode so you can literally paint your maps by clicking around.
To try it out, go to the File menu and choose New > File, then choose iOS > Resource > SpriteKit Tile Set. Select the Grid Tile Set template, name it TileSet then click Create. Xcode will produce an example tile set that contains a variety of animated images in different terrains – more than enough to get started with.
We’re going to create two levels of terrain in our map: one that contains grass and water, and one that contains sand. By layering one over the other we can create a nice, seamless map, and if we place both the layers inside a single SKNode we can move the map easily.
Tip: You can add the following code to your current game project if you want, but for testing purposes you should probably create a new SpriteKit project as a sandbox.
First please add this property to your game scene:
let map = SKNode()That will contain both the sand tiles and the grass/water tiles, so we can move and scale them together.
Add this inside the didMove(to:) method, to add the map to the main game scene, and scale it down small so we can see more – it’s a helpful way to be able to see more of the map when you’re just starting out:
addChild(map)
map.xScale = 0.2
map.yScale = 0.2
Next, we need to load the tile set that Xcode generated for us, and put in place a few constants: each tile is 128x128, and we want a 128x128 map to be generated. To load a tile set you use SKTileSet(named:) providing the name of the tile set, and not the filename. In this case, that means providing “Sample Grid Tile Set” rather than TileSet.sks. This initializer returns an optional SKTileSet, but because we specifically just added this – and because it’s rather important to the fundamental workings of our program - I feel this is safe to force unwrap.
Add this below the previous code:
let tileSet = SKTileSet(named: "Sample Grid Tile Set")!
let tileSize = CGSize(width: 128, height: 128)
let columns = 128
let rows = 128
Next we need some tiles to draw. That SKTileSet we just loaded contains a selection of tiles, but we specifically want the water, grass, and sand tiles for our map. So, we can search for those and create constants for easy reference – add this below the previous code:
let waterTiles = tileSet.tileGroups.first { $0.name == "Water" }
let grassTiles = tileSet.tileGroups.first { $0.name == "Grass"}
let sandTiles = tileSet.tileGroups.first { $0.name == "Sand"}
Finally, we can draw some tiles. We’re going to start with the sand tiles, which means creating an SKTileMapNode using the size constants from above, then calling its fill() method with the sandTiles tiles. Add this code next:
let bottomLayer = SKTileMapNode(tileSet: tileSet, columns: columns, rows: rows, tileSize: tileSize)
bottomLayer.fill(with: sandTiles)
map.addChild(bottomLayer)
Switch to an iPad simulator, then try running the code now – you should see a field of yellow.

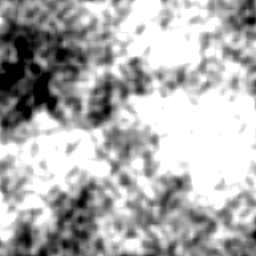
Next, we need to generate some random terrain for our grass/water layer. GameplayKit gives us a number of noise generators specifically designed for this purpose, and here we’re going to use a Perlin noise generator. This will create an image where each pixel is black, white, or some shade or gray, and we’ll use that to decide whether our terrain should be water, grass, or sand.
Make sure you have import GameplayKit in your Swift file, then add this method to your game scene:
func makeNoiseMap(columns: Int, rows: Int) -> GKNoiseMap {
    let source = GKPerlinNoiseSource()
    source.persistence = 0.9

    let noise = GKNoise(source)
    let size = vector2(1.0, 1.0)
    let origin = vector2(0.0, 0.0)
    let sampleCount = vector2(Int32(columns), Int32(rows))

    return GKNoiseMap(noise, size: size, origin: origin, sampleCount: sampleCount, seamless: true)
}
Let me briefly explain what all that does:
GKPerlinNoiseSourceis one of several GameplayKit noise generators. Perlin noise is specifically designed to make coherent noise (noise that looks meaningful), which makes it great for things like clouds and terrain.- The
persistenceproperty of the noise source determines how smooth the noise is – how likely it is to change. Higher values make it change more frequently, creating rougher terrain. GKNoiseis a general class that manages some source (our Perlin noise) and generate output.GKNoiseMapis the part we care about: it generates the actual output of noise across a specific size.- We configure the noise map to take 1x1 slices from the noise, starting at the origin (0, 0), and generating up to a fixed number of rows and columns.
- Yes, noise maps work with
Int32rather than a regularInt, because… well, I have no idea why, to be honest. Yay.
That creates a noise map, which will be a 256x256 series of values that range from -1.0 (deep water) to 1.0 (high ground).
The next step is to go back to didMove(to:), call that method to generate a noise map, then use it for our grass/water layer. This will use SpriteKit’s automapping system, which allows us to mark certain squares as being water or grass and have it automatically choose what kind of tile should be placed there so that the water and grass meet each other correctly.
First, add this to didMove(to:):
// create the noise map
let noiseMap = makeNoiseMap(columns: columns, rows: rows)

// create our grass/water layer
let topLayer = SKTileMapNode(tileSet: tileSet, columns: columns, rows: rows, tileSize: tileSize)

// make SpriteKit do the work of placing specific tiles
topLayer.enableAutomapping = true

// add the grass/water layer to our main map node
map.addChild(topLayer)
Now comes the important part: we loop over all the rows and columns in our map, read the data from our noise map at that location, then use that to place either water tiles or grass tiles depending on the height.
We can read one specific value from the noise map using code like this:
let row = 5
let column = 18
let location = vector2(Int32(row), Int32(column))
let terrainHeight = noiseMap.value(at: location)
Again, that uses Int32 because reasons. Each value will be between -1.0 and 1.0, so we need to decide where the water stops and land starts. You’re welcome to experiment all you want, but here we’re just going to say that everything below 0 is water.
Once you know which tile to use, you can apply a tile group to a specific row and column like this:
topLayer.setTileGroup(waterTiles, forColumn: column, row: row)That applies a tile group rather than a specific tile, which is where SpriteKit’s automapping system comes in: when it detects that water is becoming grass, it will render water and grass edge tiles automatically, without us needing to worry about whether it’s a top tile, bottom tile, corner tile, and so on.
To see all this in action, add this loop to the end of didMove(to:):
for column in 0 ..< columns {
for row in 0 ..< rows {
let location = vector2(Int32(row), Int32(column))
let terrainHeight = noiseMap.value(at: location)
if terrainHeight < 0 {
topLayer.setTileGroup(waterTiles, forColumn: column, row: row)
} else {
topLayer.setTileGroup(grassTiles, forColumn: column, row: row)
}
}
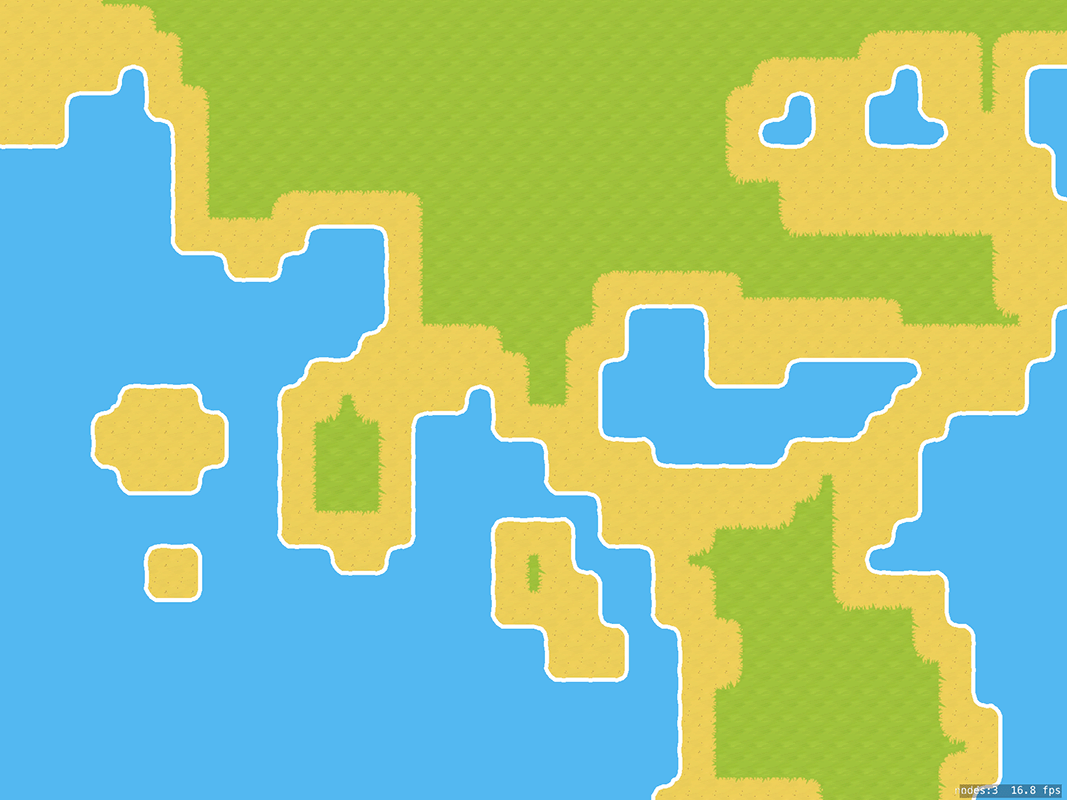
}And that’s the code complete – if you run it now you should see sand, water, and grass tiles mixed together nicely, and if you look closely you’ll even see the water’s edge is rippling gently.
TAKE YOUR SKILLS TO THE NEXT LEVEL If you like Hacking with Swift, you'll love Hacking with Swift+ – it's my premium service where you can learn advanced Swift and SwiftUI, functional programming, algorithms, and more. Plus it comes with stacks of benefits, including monthly live streams, downloadable projects, a 20% discount on all books, and free gifts!
Sponsor Hacking with Swift and reach the world's largest Swift community!
Available from iOS 10.0
Similar solutions…
- How to tile an image
- SwiftUI tips and tricks
- All SwiftUI property wrappers explained and compared
- How to create live playgrounds in Xcode
- How to manipulate an AsyncSequence using map(), filter(), and more
About the Swift Knowledge Base
This is part of the Swift Knowledge Base, a free, searchable collection of solutions for common iOS questions.


