| < Previous: Loading Core Data objects using NSFetchRequest and NSSortDescriptor | Next: Examples of using NSPredicate to filter NSFetchRequest > |
How to make a Core Data attribute unique using constraints
After such a huge amount of work getting Core Data up and running, you'll probably run your app a few times to enjoy it all working. But it's not perfect, I'm afraid: first, you'll see GitHub commits get duplicated each time the app runs, and second you'll notice that tapping on a commit doesn’t do anything.
We'll be fixing that second problem later, but for now let's focus on the first problem: duplicate GitHub commits. In fact, you probably have triplicate or quadruplicate by now, because each time you run the app the same commits are fetched and added to Core Data, so you end up with the same data being repeated time and time again.
No one wants repeated data, so we're going to fix this problem. And for once I'm pleased to say that Core Data makes this trivial thanks to a simple technology called "unique constraints." All we need to do is find some data that is guaranteed to uniquely identify a commit, tell Core Data that is a unique identifier, and it will make sure objects with that same value don't get repeated.
Even better, Core Data can intelligently merge updates to objects in situations where this is possible. It's not going to happen with us, but imagine a situation where a commit author could retrospectively change their commit message from "I fxed a bug with Swift" to "I fixed a bug with Swift." As long as the unique identifier didn't change, Core Data could recognize this was an update on the original commit, and merge the change intelligently.
In this app, we have the perfect unique attribute just waiting to be used: every commit has a "sha" attribute that is a long string of letters and numbers that identify that commit uniquely. SHA stands for "secure hash algorithm", and it's used in many places to generate unique identifiers from content.
A "hash" is a little bit like like one-way, truncated encryption: one piece of input like "Hello world" will always generate the same hash, but if you change it to be "Hello World" – just capitalizing a single letter – you get a completely different hash. It's "truncated" because no matter how much content you give it as input, the "sha" will always be 40 letters. It's "one way" because you can't somehow reverse the hash to discover the original content, which is where hashes are different to encryption: an encrypted message can be decrypted to its original content, whereas a hashed message cannot be "dehashed" back to its original.
Hashes are frequently used as a checksum to verify that a file or data is correct: if you download a 10GB file and want to be sure it's exactly what the sender created, you can just compare your hash with theirs. Because hashes are truncated to a specific size, it is technically possible for two pieces of very different content to generate the same hash, known as a "collision", but this is extremely rare.
Enough theory. Please go ahead and run your app a few times to make sure there are a good number of duplicates so you can see the problem in action. We added some print() statements in there for debugging purposes, so you'll see a message like this:
Got 500 commits
Received 100 new commits.
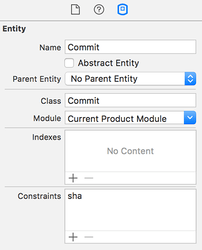
Got 600 commitsSelect the data model (Project38.xcdatamodeld) and make sure the Commit entity is selected rather than one of its attributes. If you look in the Data Model inspector you'll see a field marked "Constraints" – click the + button at the bottom of that field. A new row will appear saying "comma,separated,properties". Click on that, hit Enter to make it editable, then type "sha" and hit Enter again. Make sure you press Cmd+S to save your changes!
Now for the important part: go to the the iOS simulator, then choose the Hardware menu and Erase All Content And Settings. What you just did was completely reset the state of the iOS Simulator. The reason this is required is because you just made an important change to your model, which is generally a bad idea unless you know what you're doing.
Before you run your project again, I want you to make one tiny code change. In your viewDidLoad() method, modify the loadPersistentStores() method call to this:
container.loadPersistentStores { storeDescription, error in
    self.container.viewContext.mergePolicy = NSMergeByPropertyObjectTrumpMergePolicy

    if let error = error {
        print("Unresolved error \(error)")
    }
}
This instructs Core Data to allow updates to objects: if an object exists in its data store with message A, and an object with the same unique constraint ("sha" attribute) exists in memory with message B, the in-memory version "trumps" (overwrites) the data store version.
Go ahead and run your project a few times now and you'll see this message in the Xcode log:
Got 100 commits
Received 100 new commits.
Got 100 commits
As you can see, 100 commits were loaded from the persistent store, 100 "new" commits were pulled in from GitHub, and after Core Data resolved unique attributes there were still only 100 commits in the persistent store. Perfect! If you run your project again after a few hours, the numbers will start to go up slowly as new commits appear on GitHub – Swift is a live project, after all!
Note: in a couple of chapters I'll be introducing you to something called NSFetchedResultsController. Using attribute constraints can cause problems with NSFetchedResultsController, but in this tutorial we're always doing a full save and load of our objects because it's an easy way to avoid problems later. Don't worry about it for now – I'll mention it again at the appropriate time.
BUILD THE ULTIMATE PORTFOLIO APP Most Swift tutorials help you solve one specific problem, but in my Ultimate Portfolio App series I show you how to get all the best practices into a single app: architecture, testing, performance, accessibility, localization, project organization, and so much more, all while building a SwiftUI app that works on iOS, macOS and watchOS.
Sponsor Hacking with Swift and reach the world's largest Swift community!


