Designing our interface
Our app loads all the storm images correctly, but it doesn’t do anything interesting with them – printing to the Xcode console is helpful for debugging, but I can promise you it doesn’t make for a best-selling app!
To fix this, our next goal is to create a user interface that lists the images so users can select one. UIKit – the iOS user interface framework – has a lot of built-in user interface tools that we can draw on to build powerful apps that look and work the way users expect.
For this app, our main user interface component is called UITableViewController. It’s based on UIViewController – Apple’s most basic type of screen – but adds the ability to show rows of data that can be scrolled and selected. You can see UITableViewController in the Settings app, in Mail, in Notes, in Health, and many more – it’s powerful, flexible, and extremely fast, so it’s no surprise it gets used in so many apps.
Our existing ViewController screen is based on UIViewController, but what we want is to have it based on UITableViewController instead. This doesn’t take much to do, but you’re going to meet a new part of Xcode called Interface Builder.
We’ll get on to Interface Builder in a moment. First, though, we need to make a tiny change in ViewController.swift. Find this line:
class ViewController: UIViewController {That’s the line that says “create a new screen called ViewController and have it build on Apple’s own UIViewController screen.” I want you to change it to this:
class ViewController: UITableViewController {It’s only a small difference, but it’s an important one: it means ViewController now inherits its functionality from UITableViewController instead of UIViewController, which gives us a huge amount of extra functionality for free as you’ll see in a moment.
Behind the scenes, UITableViewController still builds on top of UIViewController – this is called a “class hierarchy”, and is a common way to build up functionality quickly.
We’ve changed the code for ViewController so that it builds on UITableViewController, but we also need to change the user interface to match. User interfaces can be written entirely in code if you want – and many developers do just that – but more commonly they are created using a graphical editor called Interface Builder. We need to tell Interface Builder (usually just called “IB”) that ViewController is a table view controller, so that it matches the change we just made in our code.
Up to this point we’ve been working entirely in the file ViewController.swift, but now I’d like you to use the project navigator (the pane on the left) to select the file Main.storyboard. Storyboards contain the user interface for your app, and let you visualize some or all of it on a single screen.
When you select Main.storyboard, you’ll switch to the Interface Builder visual editor, and you should see something like the picture below:
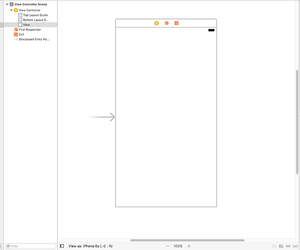
That big white space is what produces the big white space when the app runs. If you drop new components into that space, they would be visible when the app runs. However, we don’t want to do that – in fact, we don’t want that big white space at all, so we’re going to delete it.
The best way to view, select, edit, and delete items in Interface Builder is to use the document outline, but there’s a good chance it will be hidden for you so the first thing to do is show it. Go to the Editor menu and choose Show Document Outline – it’s probably the third option from the top. If you see Hide Document Outline instead, it means the document outline is already visible.
The document outline shows you all the components in all the screens in your storyboard. You should see “View Controller Scene” already in there, so please select it, then press Backspace on your keyboard to remove it.
Instead of a boring old UIViewController, we want a fancy new UITableViewController to match the change we made in our code. To create one, press Cmd+Shift+L to show the object library. Alternatively, if you dislike keyboard shortcuts you can go to the View menu and choose Libraries > Show Library instead.
The object library floats over the Xcode window, and contains a selection of graphical components that you can drag out and re-arrange to your heart’s content. It contains quite a lot of components, so you might find it useful to enter a few letters into the “Objects” box to slim down the selection.
Tip: If you want the object library to remain open after you drag something out, use Alt+Cmd+Shift+L and it will be a movable, resizable window when it appears.
Right now, the component we want is called Table View Controller. If you type “table” into the Filter box you’ll see Table View Controller, Table View, and Table View Cell. They are all different things, so please make sure you choose the Table View Controller – it has a yellow background in its icon.
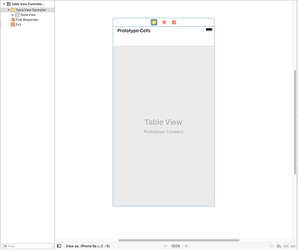
Click on the Table View Controller component, then drag it out into the large open space that exists where the previous view controller was. When you let go to drop the table view controller onto the storyboard canvas, it will transform into a screen that looks like the below:
Finishing touches for the user interface
Before we’re done here, we need to make a few small changes.
First, we need to tell Xcode that this storyboard table view controller is the same one we have in code inside ViewController.swift. To do that, press Alt+Cmd+3 to activate the identity inspector (or go to View > Utilities > Show Identity Inspector), then look at the very top for a box named “Class”. It will have “UITableViewController” written in there in light gray text, but if you click the arrow on its right side you should see a dropdown menu that contains “ViewController” – please select that now.
Second, we need to tell Xcode that this new table view controller is what should be shown when the app first runs. To do that, press Alt+Cmd+4 to activate the attributes inspector (or go to View > Utilities > Show Attributes Inspector), then look for the checkbox named “Is Initial View Controller” and make sure it’s checked.
Third, I want you to use the document outline to look inside the new table view controller. Inside you should see it contains a “Table View”, which in turn contains “Cell”. A table view cell is responsible for displaying one row of data in a table, and we’re going to display one picture name in each cell.
Please select “Cell” then, in the attributes inspector, enter the text “Picture” into the text field marked Identifier. While you’re there, change the Style option at the top of the attributes inspector – it should be Custom right now, but please change it to Basic.
Finally, we’re going to place this whole table view controller inside something else. It’s something we don’t need to configure or worry about, but it’s an extremely common user interface element on iOS and I think you’ll recognize it immediately. It’s called a navigation controller, and you see it in action in apps like Settings and Mail – it provides the thin gray bar at the top of the screen, and is responsible for that right-to-left sliding animation that happens when you move between screens on iOS.
To place our table view controller into a navigation controller, all you need to do is go to the Editor menu and choose Embed In > Navigation Controller. Interface Builder will move your existing view controller to the right and add a navigation controller around it – you should see a simulated gray bar above your table view now. It will also move the “Is Initial View Controller” property to the navigation controller.
At this point you’ve done enough to take a look at the results of your work: press Xcode’s play button now, or press Cmd+R if you want to feel a bit elite. Once your code runs, you’ll now see the plain white box replaced with a large empty table view. If you click and drag your mouse around, you’ll see it scrolls and bounces as you would expect, although obviously there’s no data in there yet. You should also see a gray navigation bar at the top; that will be important later on.
Showing lots of rows
The next step is to make the table view show some data. Specifically, we want it to show the list of “nssl” pictures, one per row. Apple’s UITableViewController data type provides default behaviors for a lot of things, but by default it says there are zero rows.
Our ViewController screen builds on UITableViewController and gets to override the default behavior of Apple’s table view to provide customization where needed. You only need to override the bits you want; the default values are all sensible.
To make the table show our rows, we need to override two behaviors: how many rows should be shown, and what each row should contain. This is done by writing two specially named methods, but when you’re new to Swift they might look a little strange at first. To make sure everyone can follow along, I’m going to take this slowly – this is the very first project, after all!
Let’s start with the method that sets how many rows should appear in the table. Add this code just after the end of viewDidLoad() – if you start typing “numberof” then you can use Xcode’s code completion to do most of the work for you:
override func tableView(_ tableView: UITableView, numberOfRowsInSection section: Int) -> Int {
    return pictures.count
}
Note: that needs to be after the end of viewDidLoad(), which means after its closing brace.
That method contains the word “table view” three times, which is deeply confusing at first, so let’s break down what it means.
- The
overridekeyword means the method has been defined already, and we want to override the existing behavior with this new behavior. If you didn't override it, then the previously defined method would execute, and in this instance it would say there are no rows. - The
funckeyword starts a new function or a new method; Swift uses the same keyword for both. Technically speaking a method is a function that appears inside a class, just like ourViewController, but otherwise there’s no difference. - The method’s name comes next:
tableView. That doesn't sound very useful, but the way Apple defines methods is to ensure that the information that gets passed into them – the parameters – are named usefully, and in this case the very first thing that gets passed in is the table view that triggered the code. A table view, as you might have gathered, is the scrolling thing that will contain all our image names, and is a core component in iOS. - As promised, the next thing to come is
tableView: UITableView, which is the table view that triggered the code. But this contains two pieces of information at once:tableViewis the name that we can use to reference the table view inside the method, andUITableViewis the data type – the bit that describes what it is. - The most important part of the method comes next:
numberOfRowsInSection section: Int. This describes what the method actually does. We know it involves a table view because that's the name of the method, but thenumberOfRowsInSectionpart is the actual action: this code will be triggered when iOS wants to know how many rows are in the table view. Thesectionpart is there because table views can be split into sections, like the way the Contacts app separates names by first letter. We only have one section, so we can ignore this number. TheIntpart means “this will be an integer,” which means a whole number like 3, 30, or 35678 number.” - Finally,
-> Intmeans “this method must return an integer”, which ought to be the number of rows to show in the table.
There was one more thing I missed out, and I missed it out for a reason: it’s a bit confusing at this point in your Swift career. Did you notice that _ in there? I hope you can remember that means the first parameter isn’t passed in using a name when called externally – this is a remnant of Objective-C, where the name of the first parameter was usually built right into the method name.
In this instance, the method is called tableView() because its first parameter is the table view that you’re working with. It wouldn’t make much sense to write tableView(tableView: someTableView), so using the underscore means you would write tableView(someTableView) instead.
I'm not going to pretend it's easy to understand how Swift methods look and work, but the best thing to do is not worry too much if you don't understand right now because after a few hours of coding they will be second nature.
At the very least you do need to know that these methods are referred to using their name (tableView) and any named parameters. Parameters without names are just referenced as underscores: _. So, to give it its full name, the method you just wrote is referred to as tableView(_:numberOfRowsInSection:) – clumsy, I know, which is why most people usually just talk about the important bit, for example, "in the numberOfRowsInSection method."
We wrote only one line of code in the method, which was return pictures.count. That means “send back the number of pictures in our array,” so we’re asking that there be as many table rows as there are pictures.
Dequeuing cells
That’s the first of two methods we need to write to complete this stage of the app. The second is to specify what each row should look like, and it follows a similar naming convention to the previous method. Add this code now:
override func tableView(_ tableView: UITableView, cellForRowAt indexPath: IndexPath) -> UITableViewCell {
    let cell = tableView.dequeueReusableCell(withIdentifier: "Picture", for: indexPath)
    cell.textLabel?.text = pictures[indexPath.row]
    return cell
}
Let’s break it down into parts again, so you can see exactly how it works.
First, override func tableView(_ tableView: UITableView is identical to the previous method: the method name is just tableView(), and it will pass in a table view as its first parameter. The _ means it doesn’t need to have a name sent externally, because it’s the same as the method name.
Second, cellForRowAt indexPath: IndexPath is the important part of the method name. The method is called cellForRowAt, and will be called when you need to provide a row. The row to show is specified in the parameter: indexPath, which is of type IndexPath. This is a data type that contains both a section number and a row number. We only have one section, so we can ignore that and just use the row number.
Third, -> UITableViewCell means this method must return a table view cell. If you remember, we created one inside Interface Builder and gave it the identifier “Picture”, so we want to use that.
Here’s where a little bit of iOS magic comes in: if you look at the Settings app, you’ll see it can fit only about 12 rows on the screen at any given time, depending on the size of your phone.
To save CPU time and RAM, iOS only creates as many rows as it needs to work. When one rows moves off the top of the screen, iOS will take it away and put it into a reuse queue ready to be recycled into a new row that comes in from the bottom. This means you can scroll through hundreds of rows a second, and iOS can behave lazily and avoid creating any new table view cells – it just recycles the existing ones.
This functionality is baked right into iOS, and it’s exactly what our code does on this line:
let cell = tableView.dequeueReusableCell(withIdentifier: "Picture", for: indexPath)That creates a new constant called cell by dequeuing a recycled cell from the table. We have to give it the identifier of the cell type we want to recycle, so we enter the same name we gave Interface Builder: “Picture”. We also pass along the index path that was requested; this gets used internally by the table view.
That will return to us a table view cell we can work with to display information. You can create your own custom table view cell designs if you want to (more on that much later!), but we’re using the built-in Basic style that has a text label. That’s where line two comes in: it gives the text label of the cell the same text as a picture in our array. Here’s the code again:
cell.textLabel?.text = pictures[indexPath.row]The cell has a property called textLabel, but it’s optional: there might be a text label, or there might not be – if you had designed your own, for example. Rather than write checks to see if there is a text label or not, Swift lets us use a question mark – textLabel? – to mean “do this only if there is an actual text label there, or do nothing otherwise.”
We want to set the label text to be the name of the correct picture from our pictures array, and that’s exactly what the code does. indexPath.row will contain the row number we’re being asked to load, so we’re going to use that to read the corresponding picture from pictures, and place it into the cell’s text label.
The last line in the method is return cell. Remember, this method expects a table view cell to be returned, so we need to send back the one we created – that’s what the return cell does.
With those two pretty small methods in place, you can run your code again now and see how it looks. All being well you should now see 10 table view cells, each one with a different picture name inside. If you click on one of them it will turn gray, but nothing else will happen. Let’s fix that now…
BUILD THE ULTIMATE PORTFOLIO APP Most Swift tutorials help you solve one specific problem, but in my Ultimate Portfolio App series I show you how to get all the best practices into a single app: architecture, testing, performance, accessibility, localization, project organization, and so much more, all while building a SwiftUI app that works on iOS, macOS and watchOS.
Sponsor Hacking with Swift and reach the world's largest Swift community!


