Creating the basic UI: UITabBarController
We’ve already used UINavigationController in previous projects to provide a core user interface that lets us control which screen is currently visible. Another fundamental UI component is the tab bar, which you see in apps such as the App Store, Music, and Photos – it lets the user control which screen they want to view by tapping on what interests them.
Our current app has a single empty view controller, but we’re going to jazz that up with a table view controller, a navigation controller, and a tab bar controller so you can see how they all work together.
You should know the drill by now, or at least part of it. Start by opening ViewController.swift and changing ViewController to inherit from UITableViewController rather than UIViewController. That is, change this line:
class ViewController: UIViewController {…to this:
class ViewController: UITableViewController {Now open Main.storyboard, remove the existing view controller, and drag out a table view controller in its place. Use the identity inspector to change its class to be “ViewController”, then make sure you check the “Is Initial View Controller” box.
Select its prototype cell and use the attributes inspector to give it the identifier “Cell”. Set its accessory to “Disclosure Indicator” while you’re there; it’s a great UI hint, and it’s perfect in this project. In this project, we’re also going to change the style of the cell – that’s the first item in the attributes inspector. It’s “Custom” by default, but I’d like you to change it to “Subtitle”, so that each row has a main title label and a subtitle label.
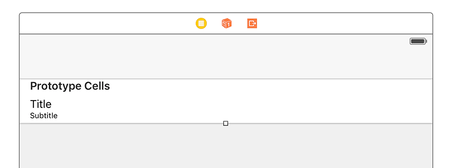
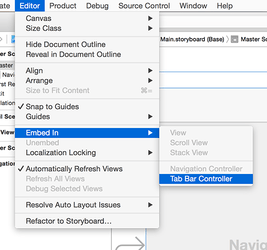
Now for the interesting part: we need to wrap this view controller inside two other things. Go to Editor > Embed In > Navigation Controller, and then straight away go to Editor > Embed In > Tab Bar Controller. The navigation controller adds a gray bar at the top called a navigation bar, and the tab bar controller adds a gray bar at the bottom called a tab bar. Hit Cmd+R now to see them both in action.
Behind the scenes, UITabBarController manages an array of view controllers that the user can choose between. You can often do most of the work inside Interface Builder, but not in this project. We're going to use one tab to show recent petitions, and another to show popular petitions, which is the same thing really – all that's changing is the data source.
Doing everything inside the storyboard would mean duplicating our view controllers, which is A Bad Idea, so instead we're just going to design one of them in the storyboard then create a duplicate of it using code.
Now that our navigation controller is inside a tab bar controller, it will have acquired a gray strip along its bottom in Interface Builder. If you click that now, it will select a new type of object called a UITabBarItem, which is the icon and text used to represent a view controller in the tab bar. In the attributes inspector (Alt+Cmd+4) change System Item from "Custom" to "Most Recent".
One important thing about UITabBarItem is that when you set its system item, it assigns both an icon and some text for the title of the tab. If you try to change the text to your own text, the icon will be removed and you need to provide your own. This is because Apple has trained users to associate certain icons with certain information, and they don't want you using those icons incorrectly!
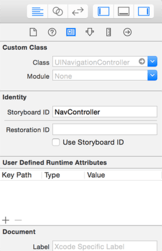
Select the navigation controller itself (just click where it says Navigation Controller in big letters in the center of the view controller), then press Alt+Cmd+3 to select the identity inspector. We haven't been here before, because it's not used that frequently. However, here I want you to type "NavController" in the text box to the right of where it says "Storyboard ID". We'll be needing that soon!
In the picture below you can see how the identity inspector should look when configured for your navigation controller. You'll be using this inspector in later projects to give views a custom class by changing the first of these four text boxes.
We're done with Interface Builder, so please open the file ViewController.swift so we can make the usual changes to get us a working table view.
First, add this property to the ViewController class:
var petitions = [String]()That will hold our petitions. We won’t be using strings in the final project – in fact we’ll change that in the next chapter – but it’s good enough for now.
Now add this numberOfRowsInSection method:
override func tableView(_ tableView: UITableView, numberOfRowsInSection section: Int) -> Int {
    return petitions.count
}
We also need to add a cellForRowAt method, but this time it’s going to be a bit different: we’re going to set some dummy textLabel.text like before, but we’re also going to set detailTextLabel.text – that’s the subtitle in our cell. It’s called “detail text label” rather than “subtitle” because there are other styles available, for example one where the detail text is on the right of the main text.
Add this method now:
override func tableView(_ tableView: UITableView, cellForRowAt indexPath: IndexPath) -> UITableViewCell {
    let cell = tableView.dequeueReusableCell(withIdentifier: "Cell", for: indexPath)
    cell.textLabel?.text = "Title goes here"
    cell.detailTextLabel?.text = "Subtitle goes here"
    return cell
}
Step one is now complete: we have a basic user interface in place, and are ready to proceed with some real code…
TAKE YOUR SKILLS TO THE NEXT LEVEL If you like Hacking with Swift, you'll love Hacking with Swift+ – it's my premium service where you can learn advanced Swift and SwiftUI, functional programming, algorithms, and more. Plus it comes with stacks of benefits, including monthly live streams, downloadable projects, a 20% discount on all books, and free gifts!
Sponsor Hacking with Swift and reach the world's largest Swift community!


