Designing a simple watchOS app to receive data
So far we have a fully working iOS app that shows cards players can flip over, has a cheat in place for 3D Touch users so you can always guess correctly, and communication happening from iOS to watchOS. The next step is to write a simple watchOS app that is able to receive that data and make the device buzz gently.
We started our project with an Xcode watchOS template, so all this time you will have seen two watchOS folders in your Xcode project: WatchKit App and WatchKit Extension. Yes, cunningly they are two separate things. The extension contains all the code that gets run, and the app contains the user interface. Both run on the Apple Watch as of watchOS 2.0, but in watchOS 1.0 the extension used to run on your iPhone.
The first thing we're going to do is design a very simple interface using WatchKit, which is the watchOS equivalent of UIKit. This interface is going to contain only a label and a button, telling users to check their phone for instructions. We haven't written those instructions yet, but all in good time…
Look inside the WatchKit App folder for Interface.storyboard, and open that in Interface Builder. Using the Object Library, just like on iOS, drag a label then a button into the small black space of our app's user interface. You will see that WatchKit automatically stacks its views vertically so the interface doesn't get too cluttered.
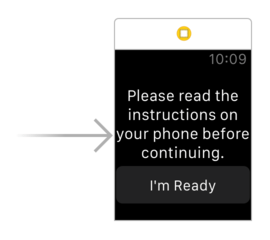
Select the label, set its Lines property to be 0 so that it spans as many lines as necessary, then align its text center and give it the following content: "Please read the instructions on your phone before continuing." Now select the button and give it the text "I'm Ready". Finally, select both the label and button then change their Vertical and Horizontal alignment properties to be Center.
All being well, your WatchKit interface should look like the screenshot below. Don't worry that the views go right to the edge – the Watch's bezel blends seamlessly with the edge of the screen in its apps, so it will look fine on devices.
That's it: that's our entire interface. Before we continue with any further coding, we need to create outlets for the label and button by using the Assistant Editor and Ctrl-dragging. Name the label welcomeText and the button hideButton – you'll notice these have the types WKInterfaceLabel and WKInterfaceButton because we're in WatchKit now, not UIKit.
Finally, create an action for when the button is tapped, again by Ctrl-dragging in the Assistant Editor. Name this hideWelcomeText(). We're done with Interface Builder now, so please go back to the standard editor and open the InterfaceController.swift file from the WatchKit Extension.
The first thing we're going to do is identical to the code from iOS: set ourselves up as the delegate for the WCSession and activate it. So, start by adding this import:
import WatchConnectivityNow add this to the willActivate() method – for our purposes, that's the equivalent of viewDidLoad() in the iOS app:
if WCSession.isSupported() {
    let session = WCSession.default
    session.delegate = self
    session.activate()
}
The code is identical to iOS – I told you this was going to be easy!
You'll get an error when you try to assign the delegate to the Watch's view controller, so you'll need to tell iOS you conform to the WCSessionDelegate protocol like this:
class InterfaceController: WKInterfaceController, WCSessionDelegate {With that, we're almost done with watchOS. In fact, we just need to do two more things, starting with implementing the hideWelcomeText() method. All this needs to do is hide the label and the button we created so that the watch's screen is blank apart from the time in the corner – we don't want any obvious UI in there that might alert people.
Hiding things in WatchKit is almost the same as iOS, so update the hideWelcomeText() to this:
@IBAction func hideWelcomeText() {
    welcomeText.setHidden(true)
    hideButton.setHidden(true)
}
Note that you need to use setHidden() rather than just changing a isHidden property as you would in UIKit.
We also need to add an empty method in order to satisfy the WCSessionDelegate protocol. Add this now:
func session(_ session: WCSession, activationDidCompleteWith activationState: WCSessionActivationState, error: Error?) {

}
The last thing we need to do for our watchOS app is to make the device tap your wrist when it receives a message from iOS. To do this, we just need to implement the didReceiveMessage method for the WCSession so that it plays a haptic effect.
There are quite a few effects to choose from, but by far the most subtle is WKHapticType.click, which is so subtle that you can't help but marvel at the engineering of the Apple Watch. Add this code just beneath hideWelcomeText():
func session(_ session: WCSession, didReceiveMessage message: [String : Any]) {
    WKInterfaceDevice().play(.click)
}
So, whenever the watch receives any message from the phone, it will tap your wrist. Perfect! But… we're not done yet. You see, we need to show some instructions on the iOS app so that everything functions correctly.
You see, not only does the Apple Watch go to sleep extremely quickly, but it also likes making noise to accompany haptic effects, which would rather spoil our hoax! So, to finish up we're going to add an alert to the iOS app reminding you to check your Apple Watch configuration every time it launches.
So, head back to ViewController.swift in your iOS app, then add this new method:
override func viewDidAppear(_ animated: Bool) {
    super.viewDidAppear(animated)

    let instructions = "Please ensure your Apple Watch is configured correctly. On your iPhone, launch Apple's 'Watch' configuration app then choose General > Wake Screen. On that screen, please disable Wake Screen On Wrist Raise, then select Wake For 70 Seconds. On your Apple Watch, please swipe up on your watch face and enable Silent Mode. You're done!"
    let ac = UIAlertController(title: "Adjust your settings", message: instructions, preferredStyle: .alert)
    ac.addAction(UIAlertAction(title: "I'm Ready", style: .default))
    present(ac, animated: true)
}
That shows instructions to users every time the app runs. Note that you need to put it inside viewDidAppear() rather than viewDidLoad() because it presents an alert view controller.

SPONSORED Join a FREE crash course for mid/senior iOS devs who want to achieve an expert level of technical and practical skills – it’s the fast track to being a complete senior developer! Hurry up because it'll be available only until April 28th.
Sponsor Hacking with Swift and reach the world's largest Swift community!


