Up and running with MapKit
The default map view works great out of the box – you can pan around, zoom in and out, and so on. If you were wondering, you need to hold down Option to trigger a virtual "pinch" gesture – just click and drag as if you were moving one finger, and the other "finger" will move in the opposite direction.
Using the assistant editor, please create an outlet for your map view called mapView. You should also set your view controller to be the delegate of the map view by Ctrl-dragging from the map view to the orange and white view controller button just above the layout area. You will also need to add import MapKit to ViewController.swift so it understands what MKMapView is.
Note: If you don’t set the map’s delegate, the rest of this project won’t work too well.
With that done, we're going to add some annotations to our map. Annotations are objects that contain a title, a subtitle and a position. The first two are both strings, the third is a new data type called CLLocationCoordinate2D, which is a structure that holds a latitude and longitude for where the annotation should be placed.
Map annotations are described not as a class, but as a protocol. This is something you haven't seen before, because so far protocols have all been about methods. But if we want to conform to the MKAnnotation protocol, which is the one we need to adopt in order to create map annotations, it states that we must have a coordinate in our annotation. That makes sense, because there's no point in having an annotation on a map if we don't know where it is. The title and subtitle are optional, but we'll provide them anyway.
Create a new file and choose iOS > Source > Cocoa Touch Class. Make it a subclass of NSObject and name it “Capital”. With map annotations, you can't use structs, and you must inherit from NSObject because it needs to be interactive with Apple's Objective-C code.
Change the contents of Capital.swift to this:
import MapKit
import UIKit

class Capital: NSObject, MKAnnotation {
    var title: String?
    var coordinate: CLLocationCoordinate2D
    var info: String

    init(title: String, coordinate: CLLocationCoordinate2D, info: String) {
        self.title = title
        self.coordinate = coordinate
        self.info = info
    }
}
There are our three properties, along with a basic initializer that just copies in the data it's given. Again, we need to use self. here because the parameters being passed in are the same name as our properties. I've added import MapKit to the file because that's where MKAnnotation and CLLocationCoordinate2D are defined.
With this custom subclass, we can create capital cities by passing in their name, coordinate and information – I'll be using the info property to hold one priceless (read: off-the-cuff, I sucked at geography) informational nugget about each city. You're welcome to do better!
Put these lines into the viewDidLoad() method of ViewController.swift:
let london = Capital(title: "London", coordinate: CLLocationCoordinate2D(latitude: 51.507222, longitude: -0.1275), info: "Home to the 2012 Summer Olympics.")
let oslo = Capital(title: "Oslo", coordinate: CLLocationCoordinate2D(latitude: 59.95, longitude: 10.75), info: "Founded over a thousand years ago.")
let paris = Capital(title: "Paris", coordinate: CLLocationCoordinate2D(latitude: 48.8567, longitude: 2.3508), info: "Often called the City of Light.")
let rome = Capital(title: "Rome", coordinate: CLLocationCoordinate2D(latitude: 41.9, longitude: 12.5), info: "Has a whole country inside it.")
let washington = Capital(title: "Washington DC", coordinate: CLLocationCoordinate2D(latitude: 38.895111, longitude: -77.036667), info: "Named after George himself.")
These Capital objects conform to the MKAnnotation protocol, which means we can send it to map view for display using the addAnnotation() method. Put this just before the end of viewDidLoad():
mapView.addAnnotation(london)
mapView.addAnnotation(oslo)
mapView.addAnnotation(paris)
mapView.addAnnotation(rome)
mapView.addAnnotation(washington)
Alternatively, you can add multiple annotations at once using the addAnnotations() method. Using this, you would replace those five lines with this:
mapView.addAnnotations([london, oslo, paris, rome, washington])That creates an array out of the annotations and sends it in one lump to the map view.
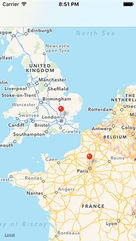
If you run your program now, you'll see pins on the map for each city, and you can tap any of them to see the city name. But where's the info property? To show more information, we need to customize the view used to show the annotations.

SPONSORED Join a FREE crash course for mid/senior iOS devs who want to achieve an expert level of technical and practical skills – it’s the fast track to being a complete senior developer! Hurry up because it'll be available only until April 28th.
Sponsor Hacking with Swift and reach the world's largest Swift community!


