Final tweaks: hidesBarsOnTap and large titles
At this point you have a working project: you can press Cmd+R to run it, flick through the images in the table, then tap one to view it. But before this project is complete, there are several other small changes we're going to make that makes the end result a little more polished.
First, you might have noticed that all the images are being stretched to fit the screen. This isn't an accident – it's the default setting of UIImageView.
This takes just a few clicks to fix: choose Main.storyboard, select the image view in the detail view controller, then choose the attributes inspector. This is in the right-hand pane, near the top, and is the fourth of six inspectors, just to the left of the ruler icon.
If you don't fancy hunting around for it, just press Cmd+Alt+4 to bring it up. The stretching is caused by the view mode, which is a dropdown button that defaults to either “Aspect Fit” or “Aspect Fill” depending on your version of Xcode Try changing that to “Aspect Fill” to see the image scaled up to fit the available space.
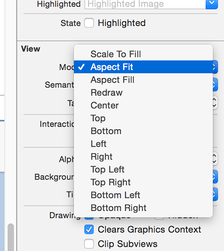
If you were wondering, Aspect Fit sizes the image so that it's all visible. There's also Scale to Fill, which sizes the image so that there's no space left blank by stretching it on both axes. If you use Aspect Fill, the image effectively hangs outside its view area, so you should make sure you enable Clip To Bounds to avoid the image overspilling.
The second change we're going to make is to allow users to view the images fullscreen, with no navigation bar getting in their way. There's a really easy way to make this happen, and it's a property on UINavigationController called hidesBarsOnTap. When this is set to true, the user can tap anywhere on the current view controller to hide the navigation bar, then tap again to show it.
Be warned: you need to set it carefully when working with iPhones. If we had it set on all the time then it would affect taps in the table view, which would cause havoc when the user tried to select things. So, we need to enable it when showing the detail view controller, then disable it when hiding.
You already met the method viewDidLoad(), which is called when the view controller's layout has been loaded. There are several others that get called when the view is about to be shown, when it has been shown, when it's about to go away, and when it has gone away. These are called, respectively, viewWillAppear(), viewDidAppear(), viewWillDisappear() and viewDidDisappear(). We're going to use viewWillAppear() and viewWillDisappear() to modify the hidesBarsOnTap property so that it's set to true only when the detail view controller is showing.
Open DetailViewController.swift, then add these two new methods directly below the end of the viewDidLoad() method:
override func viewWillAppear(_ animated: Bool) {
    super.viewWillAppear(animated)
    navigationController?.hidesBarsOnTap = true
}

override func viewWillDisappear(_ animated: Bool) {
    super.viewWillDisappear(animated)
    navigationController?.hidesBarsOnTap = false
}
There are some important things to note in there:
- We're using
overridefor each of these methods, because they already have defaults defined inUIViewControllerand we're asking it to use ours instead. Don't worry if you aren't sure when to use override and when not, because if you don't use it and it's required Xcode will tell you. - Both methods have a single parameter: whether the action is animated or not. We don't really care in this instance, so we ignore it.
- Both methods use the
superprefix again:super.viewWillAppear()andsuper.viewWillDisappear(). This means "tell my parent data type that these methods were called." In this instance, it means that it passes the method on toUIViewController, which may do its own processing. - We’re using the
navigationControllerproperty again, which will work fine because we were pushed onto the navigation controller stack fromViewController. We’re accessing the property using?, so if somehow we weren’t inside a navigation controller thehidesBarsOnTaplines will do nothing.
If you run the app now, you'll see that you can tap to see a picture full size, and it will no longer be stretched. While you're viewing a picture you can tap to hide the navigation bar at the top, then tap to show it again.
The third change is a small but important one. If you look at other apps that use table views and navigation controllers to display screens (again, Settings is great for this), you might notice gray arrows at the right of the table view cells. This is called a disclosure indicator, and it’s a subtle user interface hint that tapping this row will show more information.
It only takes a few clicks in Interface Builder to get this disclosure arrow in our table view. Open Main.storyboard, then click on the table view cell – that’s the one that says “Title”, directly below “Prototype Cells”. The table view contains a cell, the cell contains a content view, and the content view contains a label called “Title” so it’s easy to select the wrong thing. As a result, you’re likely to find it easiest to use the document outline to select exactly the right thing – you want to select the thing marked “Picture”, which is the reuse identifier we attached to our table view cell.
When that’s selected, you should be able go to the attributes inspector and see “Style: Basic”, “Identifier: Picture”, and so on. You will also see “Accessory: None” – please change that to “Disclosure Indicator”, which will cause the gray arrow to show.
The fourth is small but important: we’re going to place some text in the gray bar at the top. You’ve already seen that view controllers have storyboard and navigationController properties that we get from UIViewController. Well, they also have a title property that automatically gets read by navigation controller: if you provide this title, it will be displayed in the gray navigation bar at the top.
In ViewController, add this code to viewDidLoad() after the call to super.viewDidLoad():
title = "Storm Viewer"This title is also automatically used for the “Back” button, so that users know what they are going back to.
In DetailViewController we could add something like this to viewDidLoad():
title = "View Picture"That would work fine, but instead we’re going to use some dynamic text: we’re going to display the name of the selected picture instead.
Add this to viewDidLoad() in DetailViewController:
title = selectedImageWe don’t need to unwrap selectedImage here because both selectedImage and title are optional strings – we’re assigning one optional string to another. title is optional because it’s nil by default: view controllers have no title, thus showing no text in the navigation bar.
Large titles
This is an entirely optional change, but I wanted to introduce it to you nice and early so you can try it for yourself and see what you think.
One of Apple’s design guidelines is the use of large titles – the text that appears in the gray bar at the top of apps. The default style is small text, which is what we’ve had so far, but with a couple of lines of code we can adopt the new design.
First, add this to viewDidLoad() in ViewController.swift:
navigationController?.navigationBar.prefersLargeTitles = trueThat enables large titles across our app, and you’ll see an immediate difference: “Storm Viewer” becomes much bigger, and in the detail view controller all the image titles are also big. You’ll notice the title is no longer static either – if you pull down gently you’ll see it stretches ever so slightly, and if you try scrolling up in our table view you’ll see the titles shrinks away.
Apple recommends you use large titles only when it makes sense, and that usually means only on the first screen of your app. As you’ve seen, the default behavior when enabled is to have large titles everywhere, but that’s because each new view controller that pushed onto the navigation controller stack inherits the style of its predecessor.
In this app we want “Storm Viewer” to appear big, but the detail screen to look normal. To make that happen we need to add a line of code to viewDidLoad() in DetailViewController.swift:
navigationItem.largeTitleDisplayMode = .neverThat’s all it takes – the large titles should behave properly now.

SPONSORED Join a FREE crash course for mid/senior iOS devs who want to achieve an expert level of technical and practical skills – it’s the fast track to being a complete senior developer! Hurry up because it'll be available only until April 28th.
Sponsor Hacking with Swift and reach the world's largest Swift community!


