Building a detail screen
At this point in our app, we have a list of pictures to choose from, but although we can tap on them nothing happens. Our next goal is to design a new screen that will be shown when the user taps any row. We’re going to make it show their selected picture full screen, and it will slide in automatically when a picture is tapped.
This task can be split into two smaller tasks. First, we need to create some new code that will host this detail screen. Second, we need to draw the user interface for this screen inside Interface Builder.
Let’s start with the easy bit: create new code to host the detail screen. From the menu bar, go to the File menu and choose New > File, and a window full of options will appear. From that list, choose iOS > Cocoa Touch Class, then click Next.
You’ll be asked to name the new screen, and also tell iOS what it should build on. Please enter “DetailViewController” for the name, and “UIViewController” for “Subclass Of”. Make sure “Also create XIB file” is deselected, then click Next and Create to add the new file.
That’s the first job done – we have a new file that will contain code for the detail screen.
The second task takes a little more thinking. Go back to Main.storyboard, and you’ll see our existing two view controllers there: that’s the navigation view controller on the left, and the table view controller on the right. We’re going to add a new view controller – a new screen – now, which will be our detail screen.
First, open the object library and find “View Controller” in there. Drag it out into the space to the right of your existing view controller. You could place it anywhere, really, but it’s nice to arrange your screens so they flow logically from left to right.
Now, if you look in the document outline you’ll see a second “View Controller scene” has appeared: one for the table view, and one for the detail view. If you’re not sure which is which, just click in the new screen – in the big white empty space that just got created – and it should select the correct scene in the document outline.
When we created our table view cell previously, we gave it an identifier so that we could load it in code. We need to do the same thing for this new screen. When you selected it a moment ago, it should have highlighted “View” in the document outline. Above that will be “View Controller” with a yellow icon next to it – please click on that to select the whole view controller now.
To give this view controller a name, go to the identity inspector by pressing Cmd+Alt+3 or by using the menu. Now enter “Detail” where it says “Storyboard ID”. That’s it: we can now refer to this view controller as “Detail” in code. While you’re there, please click the arrow next to the Class box and select “DetailViewController” so that our user interface is connected to the new code we made earlier.
Now for the interesting part: we want this screen to display the user’s selected image nice and big, so we need to use a new user interface component called UIImageView. As you should be able to tell from the name, this is a part of UIKit (hence the “UI”), and is responsible for viewing images – perfect!
Look in the object library to find Image View; you might find it easiest to use the filter box again. Click and drag the image view from the object library onto the detail view controller, then let go. Now, drag its edges so that it fills the entire view controller.
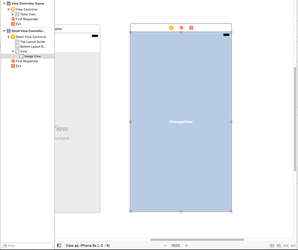
This image view has no content right now, so it's filled with a pale blue background and the word UIImageView. We won't be assigning any content to it right now, though – that's something we'll do when the program runs. Instead, we need to tell the image view how to size itself for our screen, whether that's iPhone or iPad.
This might seem strange at first, after all you just placed it to fill the view controller, and it has the same size as the view controller, so that should be it, right? Well, not quite. Think about it: there are lots of iOS devices your app might run on, all with different sizes. So, how should the image view respond when it’s being shown on a 6 Plus or perhaps even an iPad?
iOS has an answer for this. And it's a brilliant answer that in many ways works like magic to do what you want. It's called Auto Layout: it lets you define rules for how your views should be laid out, and it automatically makes sure those rules are followed.
But – and this is a big but! – it has two rules of its own, both of which must be followed by you:
- Your layout rules must be complete. That is, you can't specify only an X position for something, you must also specify a Y position. If it's been a while since you were at school, "X" is position from the left of the screen, and "Y" is position from the top of the screen.
- Your layout rules must not conflict. That is, you can't specify that a view must be 10 points away from the left edge, 10 points away from the right edge, and 1000 points wide. An iPhone 5 screen is only 320 points wide, so your layout is mathematically impossible. Auto Layout will try to recover from these problems by breaking rules until it finds a solution, but the end result is never what you want.
You can create Auto Layout rules – known as constraints – entirely inside Interface Builder, and it will warn you if you aren't following the two rules. It will even help you correct any mistakes you make by suggesting fixes. Note: the fixes it suggests might be correct, but they might not be – tread carefully!
We're going to create four constraints now: one each for the top, bottom, left and right of the image view so that it expands to fill the detail view controller regardless of its size. There are lots of ways of adding Auto Layout constraints, but the easiest way right now is to select the image view then go to the Editor menu and choose > Resolve Auto Layout Issues > Reset To Suggested Constraints.
You’ll see that option listed twice in the menu because there are two subtly different options, but in this instance it doesn’t matter which one you choose. If you prefer keyboard shortcuts, press Shift+Alt+Cmd+= to accomplish the same thing.
Visually, your layout will look pretty much identical once you've added the constraints, but there are two subtle differences. First, there's a thin blue line surrounding the UIImageView on the detail view controller, which is Interface Builder's way of showing you that the image view has a correct Auto Layout definition.
Second, in the document outline pane you'll see a new entry for "Constraints" beneath the image view. All four constraints that were added are hidden under that Constraints item, and you can expand it to view them individually if you’re curious.
With the constraints added, there's one more thing to do here before we're finished with Interface Builder, and that's to connect our new image view to some code. You see, having the image view inside the layout isn't enough – if we actually want to use the image view inside code, we need to create a property for it that's attached to the layout.
This property is like the pictures array we made previously, but it has a little bit more “interesting” Swift syntax we need to cover. Even more cunningly, it’s created using a really bizarre piece of user interface design that will send your brain for a loop if you’ve used other graphical IDEs.
Let’s dive in, and I’ll explain on the way. Xcode has a special display layout called the Assistant Editor, which splits your Xcode editor in two: the view you had before on top, and a related view at the bottom. In this case, it's going to show us Interface Builder on top, and the code for the detail view controller below.
Xcode decides what code to show based on what item is selected in Interface Builder, so make sure the image view is still selected and choose View > Assistant Editor > Show Assistant Editor from the menu. You can also use the keyboard shortcut Alt+Cmd+Return if you prefer.
Xcode can display the assistant editor as two vertical panes rather than two horizontal panes. I find the horizontal panes easiest – i.e., one above the other. You can switch between them by going to View > Assistant Editor and choosing either Assistant Editors On Right or Assistant Editors on Bottom.
Regardless of which you prefer, you should now see the detail view controller in Interface Builder in one pane, and in the other pane the source code for DetailViewController.swift. Xcode knows to load DetailViewController.swift because you changed the class for this screen to be “DetailViewController” just after you changed its storyboard ID.
Now for the bizarre piece of UI. What I want you to do is this:
- Make sure the image view is selected.
- Hold down the Ctrl key on your keyboard.
- Press your mouse button down on the image view, but hold it down – don’t release it.
- While continuing to hold down Ctrl and your mouse button, drag from the image view into your code – into the other assistant editor pane.
- As you move your mouse cursor, you should see a blue line stretch out from the image view into your code. Stretch that line so that it points between
class DetailViewController: UIViewController {andoverride func viewDidLoad() {. - When you’re between those two, a horizontal blue line should appear, along with a tooltip saying Insert Outlet Or Outlet Connection. When you see that, let go of both Ctrl and your mouse button. (It doesn’t matter which one you release first.)
If you follow those steps, a balloon should appear with five fields: Connection, Object, Name, Type, and Storage.
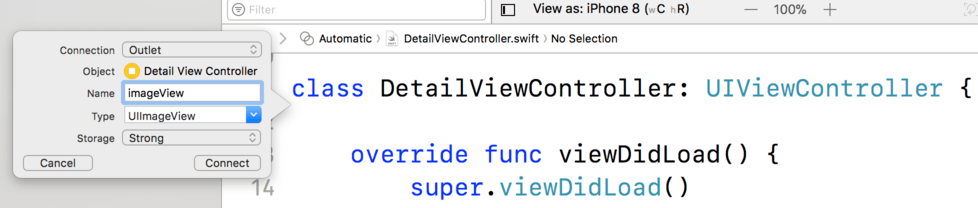
By default the options should be “Outlet” for connection, “Detail View Controller” for Object, nothing for name, “UIImageView” for type, and “Strong” for storage. If you see “Weak” for storage please change it to “Strong” – Xcode will remember that setting from now on.
Leave all of them alone except for Name – I’d like you to enter “imageView” in there. When you’ve done that click the Connect button, and Xcode will insert a line of code into DetailViewController.swift. You should see this:
class DetailViewController: UIViewController {
    @IBOutlet var imageView: UIImageView!

    override func viewDidLoad() {
        super.viewDidLoad()
To the left of the new line of code, in the gutter next to the line number, is a gray circle with a line around it. If you move your mouse cursor over that you’ll see the image view flash – that little circle is Xcode’s way of telling you the line of code is connected to the image view in your storyboard.
So, we Ctrl-dragged from Interface Builder straight into our Swift file, and Xcode wrote a line of code for us as a result. Some bits of that code are new, so let's break down the whole line:
@IBOutlet: This attribute is used to tell Xcode that there's a connection between this line of code and Interface Builder.var: This declares a new variable or variable property.imageView: This was the property name assigned to theUIImageView. Note the way capital letters are used: variables and constants should start with a lowercase letter, then use a capital letter at the start of any subsequent words. For example,myAwesomeVariable. This is sometimes called camel case.UIImageView!: This declares the property to be of typeUIImageView, and again we see the implicitly unwrapped optional symbol:!. This means that thatUIImageViewmay be there or it may not be there, but we're certain it definitely will be there by the time we want to use it.
If you were struggling to understand implicitly unwrapped optionals (don't worry; they are complicated!), this code might make it a bit clearer. You see, when the detail view controller is being created, its view hasn't been loaded yet – it's just some code running on the CPU.
When the basic stuff has been done (allocating enough memory to hold it all, for example), iOS goes ahead and loads the layout from the storyboard, then connects all the outlets from the storyboard to the code.
So, when the detail controller is first made, the UIImageView doesn't exist because it hasn't been created yet – but we still need to have some space for it in memory. At this point, the property is nil, or just some empty memory. But when the view gets loaded and the outlet gets connected, the UIImageView will point to a real UIImageView, not to nil, so we can start using it.
In short: it starts life as nil, then gets set to a value before we use it, so we're certain it won't ever be nil by the time we want to use it – a textbook case of implicitly unwrapped optionals. If you still don't understand implicitly unwrapped optionals, that's perfectly fine – keep on going and they'll become clear over time.
That’s our detail screen complete – we’re done with Interface Builder for now, and can return to code. This also means we’re done with the assistant editor, so you can return to the full-screen editor by going to View > Standard Editor > Show Standard Editor.
BUILD THE ULTIMATE PORTFOLIO APP Most Swift tutorials help you solve one specific problem, but in my Ultimate Portfolio App series I show you how to get all the best practices into a single app: architecture, testing, performance, accessibility, localization, project organization, and so much more, all while building a SwiftUI app that works on iOS, macOS and watchOS.
Sponsor Hacking with Swift and reach the world's largest Swift community!


