Setting up
In this project you'll produce an application that lets users scroll through a list of images, then select one to view. It's deliberately simple, because there are many other things you'll need to learn along the way, so strap yourself in – this is going to be long!
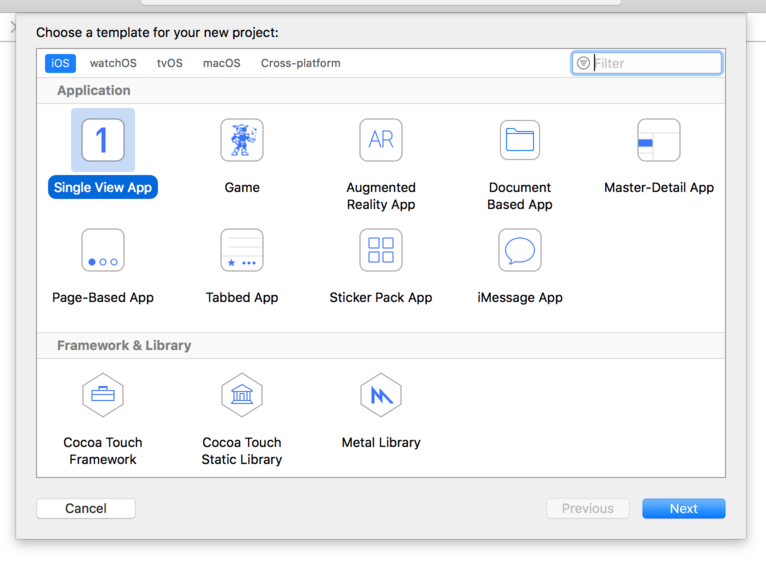
Launch Xcode, and choose "Create a new Xcode project" from the welcome screen. Choose Single View App from the list and click Next. For Product Name enter Project1, then make sure you have Swift selected for the language.
One of the fields you'll be asked for is "Organization Identifier", which is a unique identifier usually made up of your personal web site domain name in reverse. For example, I would use com.hackingwithswift if I were making an app. You'll need to put something valid in there if you're deploying to devices, but otherwise you can just use com.example.
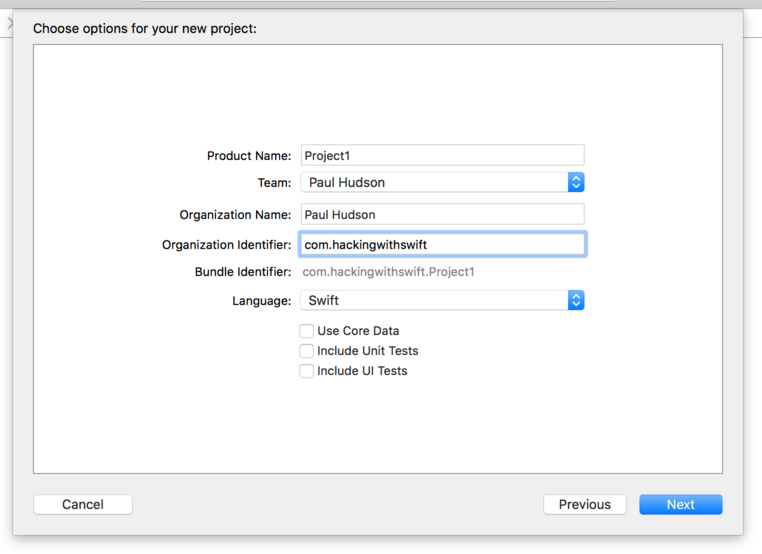
Important note: some of Xcode's project templates have checkboxes saying "Use Core Data", "Include Unit Tests" and "Include UI Tests". Please ensure these boxes are unchecked for this project and indeed almost all projects in this series – there’s only one project where this isn’t the case, and it’s made pretty clear there!
Now click Next again and you'll be asked where you want to save the project – your desktop is fine. Once that's done, you'll be presented with the example project that Xcode made for you. The first thing we need to do is make sure you have everything set up correctly, and that means running the project as-is.
When you run a project, you get to choose what kind of device the iOS Simulator should pretend to be, or you can also select a physical device if you have one plugged in. These options are listed under the Product > Destination menu, and you should see iPad Air, iPhone 8, and so on.
There's also a shortcut for this menu: at the top-left of Xcode's window is the play and stop button, but to the right of that it should say Project1 then a device name. You can click on that device name to select a different device.
For now, please choose iPhone XR, and click the Play triangle button in the top-left corner. This will compile your code, which is the process of converting it to instructions that iPhones can understand, then launch the simulator and run the app. As you'll see when you interact with the app, our “app” just shows a large white screen – it does nothing at all, at least not yet.

You'll be starting and stopping projects a lot as you learn, so there are three basic tips you need to know:
- You can run your project by pressing Cmd+R. This is equivalent to clicking the play button.
- You can stop a running project by pressing Cmd+. when Xcode is selected.
- If you have made changes to a running project, just press Cmd+R again. Xcode will prompt you to stop the current run before starting another. Make sure you check the "Do not show this message again" box to avoid being bothered in the future.
This project is all about letting users select images to view, so you're going to need to import some pictures. Download the files for this project from GitHub (https://github.com/twostraws/HackingWithSwift), and look in the “project1-files” folder. You'll see another folder in there called Content, and I’d like you to drag that Content folder straight into your Xcode project, just under where it says "Info.plist".
Tip: If you’re not sure what to download, use this link: https://github.com/twostraws/HackingWithSwift/archive/main.zip – that’s the zip file for all my project files.
A window will appear asking how you want to add the files: make sure "Copy items if needed" is checked, and "Create groups" is selected. Important: do not choose "Create folder references" otherwise your project will not work.
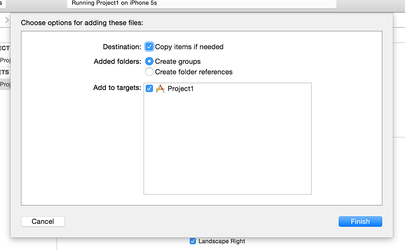
Click Finish and you'll see a yellow Content folder appear in Xcode. If you see a blue one, you didn't select "Create groups", and you'll have problems following this tutorial!

SPONSORED Join a FREE crash course for mid/senior iOS devs who want to achieve an expert level of technical and practical skills – it’s the fast track to being a complete senior developer! Hurry up because it'll be available only until April 28th.
Sponsor Hacking with Swift and reach the world's largest Swift community!


