How to render UIViews in 3D using CATransformLayer
Creating and animating 3D effects takes only a few lines of code.

Most of the time our UIViews are backed by a regular CALayer, but Core Animation gives us a variety of alternatives to choose from. CATiledLayer lets us handle tiled images as seen in Maps, CAGradientLayer creates color gradients, CAEmitterLayer creates particles, and more, but in this article I want to look at CATransformLayer, which lets us render multiple sublayers with a 3D transform applied.
I’m going to walk through three different examples so you can get a taste of what’s possible, but first I want to show you the most important part:
var perspective = CATransform3DIdentity
perspective.m34 = -1 / 500

let transformLayer = CATransformLayer()
transformLayer.transform = perspective
That creates a 3D transform, modifies it slightly, then applies it to a transform layer. The curious part is the second line, which modifies a property called m34 to be -1 / 500. CATransform3D is 4x4 matrix of numbers, so it has properties such as m11, m12, m21, and so on up to m44. Each one refers to the value in a specific row and column of the transformation matrix.
Taken together, a CATransform3D defines exactly how an object is positioned in space – its position, rotation, and so on. We don’t need anything fancy for our transform layer, but we do want it to simulate some perspective. That’s where m34 comes in: it’s sort of like the distance from your eye to where the scene is being rendered, and it effects how strong the 3D effects appeared. Later on you can try adjusting it to see what I mean – a value like -1 / 100 will have a really strong 3D effect, whereas -1 / 2000 will be much weaker.
Anyway, just creating a transform layer isn’t enough – we need to do something with it. Once you’ve created your CATransformLayer and configured its perspective, you can go ahead and add new instances of CALayer to it to make them have a 3D effect. We’ll create some layers by hand later, but for now we’ll rely on the fact that all instances of UIView or its subclasses have a layer property – we can create an image view, and add that to our transform layer.
We need a sandbox to play around in, so please go ahead and make a new iOS project using the Single View App template. Open ViewController.swift and give it this property:
let imageView = UIImageView(frame: CGRect(x: -150, y: -150, width: 300, height: 300))That’s the image view we’ll be rendering in 3D space. It’s important we keep a strong reference to it somewhere, because just adding its layer to a CATransformLayer isn’t enough to keep it alive.
We’re going to write some code in viewDidAppear() that loads an image into that image view, creates a CATransformLayer and configures with some perspective, then adds the layer of the image view to the transform layer, and adds the transform layer to the layer for our main view.
Baby steps, though! First, here’s a basic viewDidAppear() that sets up the image view:
override func viewDidAppear(_ animated: Bool) {
    super.viewDidAppear(true)

    imageView.image = UIImage(named: "TestingSwift")
    imageView.contentMode = .scaleAspectFit

    // more code to come
}
Note: You’ll need to provide your own image, so you should import something into your asset catalog.
The next step is to create a CATransformLayer and configure it to render perspective correctly. Put this in place of the // more code to come comment:
let transformLayer = CATransformLayer()
var perspective = CATransform3DIdentity
perspective.m34 = -1 / 500
transformLayer.transform = perspective
Next is an important step: for our 3D effect to work correctly, we really want our transform layer to be centered on the screen. This isn’t required – perhaps you might want the effect to be positioned off to one side, for example – but it works best here to have the thing centered. So, our next line of code is this:
transformLayer.position = CGPoint(x: view.bounds.midX, y: view.bounds.midY)Finally, we need to add the image view’s layer to the transform layer, then add the transform layer to the layer for our main view, like this:
transformLayer.addSublayer(imageView.layer)
view.layer.addSublayer(transformLayer)
Now, before you run the code please on just for a second. We’ve placed our image view in the transform layer and set up some perspective, but we still won’t see anything special. You see, we haven’t actually done anything with our image view layer yet – it’s still being shown head on to the camera.
To make this actually interesting we could give the image view layer a transform like this one:
imageView.layer.transform = CATransform3DMakeRotation(-0.5, 1, 0, 0)While that works, it’s not exactly exciting: the image has a 3D effect, but is just sitting there as you can see below.

Let’s aim a little higher and create a 3D animation so that our image view looks awesome:
let anim = CABasicAnimation(keyPath: "transform")
anim.fromValue = CATransform3DMakeRotation(0.5, 1, 0, 0)
anim.toValue = CATransform3DMakeRotation(-0.5, 1, 0, 0)
anim.duration = 1
anim.autoreverses = true
anim.repeatCount = 10
imageView.layer.add(anim, forKey: "transform")
If you try that you’ll see our image view rocks back and forth smoothly in 3D space – not bad, but we’re only just getting started…
BUILD THE ULTIMATE PORTFOLIO APP Most Swift tutorials help you solve one specific problem, but in my Ultimate Portfolio App series I show you how to get all the best practices into a single app: architecture, testing, performance, accessibility, localization, project organization, and so much more, all while building a SwiftUI app that works on iOS, macOS and watchOS.
Sponsor Hacking with Swift and reach the world's largest Swift community!
Creating a 3D box
One of the few books on iOS that have lasted the test of time is Nick Lockwood’s book iOS Core Animation: Advanced Techniques. It predates Swift and hasn’t been updated, but as a source of ideas for Core Animation nothing beats it.
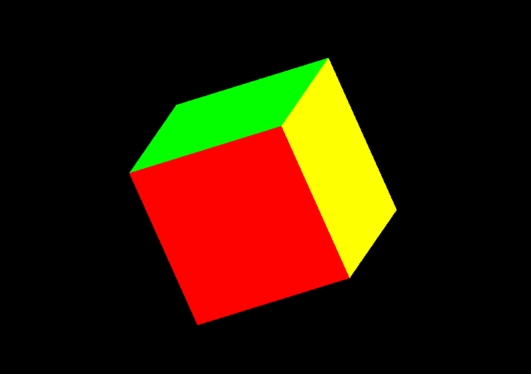
I asked Nick if it was OK if I took one of his ideas and converted it to Swift, and, Nick being as nice as he is, he gave me the green light. So, let me show you what CATransformLayer is capable of: we can create a 3D box out of layers, then have it spin around indefinitely.
First, either create a fresh Single View App project to work with or clean out the code from above, because we want a clean slate.
Next, let’s add a method to the ViewController class that is responsible for creating one face of the cube. This will take a transform – how to move, rotate, and scale the layer – along with the color. We’re not going to use UIView here because we’re just making colored squares, so this will create and return a CALayer.
Here’s the code:
func face(with transform: CATransform3D, color: UIColor) -> CALayer {
    let face = CALayer()
    face.frame = CGRect(x: -50, y: -50, width: 100, height: 100)
    face.backgroundColor = color.cgColor
    face.transform = transform
    return face
}
Next, we’re going to fill in viewDidAppear() so that we create a transform layer, then create the six faces of our cube. To make the colors stand out a little, we’re also going to set the background color of our view to be black.
Here’s the code:
override func viewDidAppear(_ animated: Bool) {
    super.viewDidAppear(true)

    view.backgroundColor = .black

    let cube = CATransformLayer()

    // create the front face
    let transform1 = CATransform3DMakeTranslation(0, 0, 50)
    cube.addSublayer(face(with: transform1, color: .red))

    // create the right-hand face
    var transform2 = CATransform3DMakeTranslation(50, 0, 0)
    transform2 = CATransform3DRotate(transform2, CGFloat.pi / 2, 0, 1, 0)
    cube.addSublayer(face(with: transform2, color: .yellow))

    // create the top face
    var transform3 = CATransform3DMakeTranslation(0, -50, 0)
    transform3 = CATransform3DRotate(transform3, CGFloat.pi / 2, 1, 0, 0)
    cube.addSublayer(face(with: transform3, color: .green))

    // create the bottom face
    var transform4 = CATransform3DMakeTranslation(0, 50, 0)
    transform4 = CATransform3DRotate(transform4, -(CGFloat.pi / 2), 1, 0, 0)
    cube.addSublayer(face(with: transform4, color: .white))

    // create the left-hand face
    var transform5 = CATransform3DMakeTranslation(-50, 0, 0)
    transform5 = CATransform3DRotate(transform5, -(CGFloat.pi / 2), 0, 1, 0)
    cube.addSublayer(face(with: transform5, color: .cyan))

    // create the back face
    var transform6 = CATransform3DMakeTranslation(0, 0, -50)
    transform6 = CATransform3DRotate(transform6, CGFloat.pi, 0, 1, 0)
    cube.addSublayer(face(with: transform6, color: .magenta))

    // now position the transform layer in the center
    cube.position = CGPoint(x: view.bounds.midX, y: view.bounds.midY)

    // and add the cube to our main view's layer
    view.layer.addSublayer(cube)
}
Once again, though, that won’t look interesting because the cube is static. To fix that, we need to make the cube spin around with a CABasicAnimation. We’re going to use its isCumulative property so that the animation continues where it left off, allowing us to keep spinning the cube indefinitely.
Add this code to the end of viewDidAppear():
let anim = CABasicAnimation(keyPath: "transform")
anim.fromValue = cube.transform
anim.toValue = CATransform3DMakeRotation(CGFloat.pi, 1, 1, 1)
anim.duration = 2
anim.isCumulative = true
anim.repeatCount = .greatestFiniteMagnitude
cube.add(anim, forKey: "transform")
Now we have a 3D box spinning around, all constructed with instances of CALayer.

But wait – there’s more!
A long time ago…
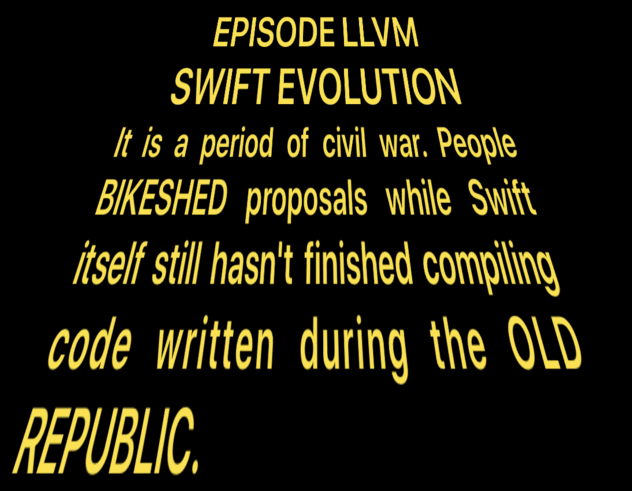
Now that you have an idea of what CATransformLayer can do, let’s have some fun with it and hack together a Star Wars opening crawl – that’s the bright yellow text flying off into the distance in most Star Wars movies. This is just for fun, because I suspect not many apps would want this as their splash screen!
Once again, go ahead and clear your project or make a new one, then give your view controller a property to store an opening crawl label:
var openingCrawl: UILabel!We’re going to write our code in viewDidAppear() so that we have an exact size for our view, and once again we’re going to start by making the view’s background color black:
override func viewDidAppear(_ animated: Bool) {
    super.viewDidAppear(true)

    view.backgroundColor = .black
}
To make this label look close to the original crawl, we need to use an NSAttributedString with some specific styles:
- The title text should be centered.
- The main text should be justified (stretched from left to right).
- The title should have a bold, 32-point font.
- The text should have a bold, 22-point font.
So, add this to viewDidAppear():
let titleParagraphStyle = NSMutableParagraphStyle()
titleParagraphStyle.alignment = .center

let textParagraphStyle = NSMutableParagraphStyle()
textParagraphStyle.alignment = .justified

let titleAttributes = [NSAttributedString.Key.font: UIFont.boldSystemFont(ofSize: 32), NSAttributedString.Key.paragraphStyle: titleParagraphStyle]
let textAttributes = [NSAttributedString.Key.font: UIFont.boldSystemFont(ofSize: 22), NSAttributedString.Key.paragraphStyle: textParagraphStyle]
Next we need some text to render. At this year’s Nextdoor conference in San Jose I gave a talk What Star Wars Can Teach Us About Swift, so naturally I wrote some opening crawl text just for that – here it is:
let mainText = "It is a period of civil war. People BIKESHED proposals while Swift itself still hasn't finished compiling code written during the OLD REPUBLIC.\n\nXCODE crashes faster than a speeder bike on Endor, but undeterred Apple unleashed a new wave of Auto Layout problems with THE NOTCH.\n\nMeanwhile, the GALACTIC EMPI — er, GOOGLE — are building an army of clones using Java Kotlin Flutter. Now all hopes for the REBEL ALLIANCE lie with Swift's developers, who must add features, fix bugs, and, most importantly, prepare t— ERROR Assertion failed: (hasInterfaceType() && \"No interface type was set\"), function getInterfaceType, file /Users/Crusty/workspace/swift/AST/Decl.cpp line 1977."Now we can put that and our title into attributed strings, then join them together:
let title = NSMutableAttributedString(string: "EPISODE LLVM\nSWIFT EVOLUTION\n", attributes: titleAttributes)
let text = NSAttributedString(string: mainText, attributes: textAttributes)
title.append(text)
All that code is just to get a single NSAttributedString that holds the text we want to render. The next step is to create a UILabel that holds the crawl text, making sure that is has the correct color and has its numberOfLines property set to 0 so that it wraps across as many lines as needed:
openingCrawl = UILabel()
openingCrawl.translatesAutoresizingMaskIntoConstraints = false
openingCrawl.attributedText = title
openingCrawl.textColor = UIColor(red: 250/255.0, green: 226/255.0, blue: 83/255.0, alpha: 1)
openingCrawl.numberOfLines = 0
We want our label to fit the screen, with a small amount of space at the edges. So, the next step is to use sizeThatFits() on the label, passing in the width of our view minus 20 and a huge height because we don’t care how long it is:
let labelSize = openingCrawl.sizeThatFits(CGSize(width: view.bounds.width - 20, height: CGFloat.greatestFiniteMagnitude))
openingCrawl.frame = CGRect(x: 10 - (view.bounds.width / 2), y: 0, width: labelSize.width, height: labelSize.height)
Like before, we need a CATransformLayer centered in our view, which we’ll use to host our opening crawl text and add to our main view:
let layer = CATransformLayer()
layer.position = CGPoint(x: view.bounds.midX, y: view.bounds.midY)

var perspective = CATransform3DIdentity
perspective.m34 = -1 / 100
layer.transform = perspective

layer.addSublayer(openingCrawl.layer)
view.layer.addSublayer(layer)
Using a perspective of -1 / 100 gives a more pronounced 3D effect, but I think it works well enough – you’re welcome to expirement.
Now comes the new part: we need to make the crawl move horizontally backwards into the screen, flying off into the distance. To do that, we’re going to rotate the text backwards a little, then push it down below the bottom of the screen so that it starts hidden:
let crawlTransformStart = CATransform3DMakeRotation(0.5, 1, 0, 0)
openingCrawl.layer.transform = CATransform3DTranslate(crawlTransformStart, 0, 400, 0)
Note: Rotating then translating produces a very different result from translating then rotating – be careful!
Now that our text is rotated and positioned correctly, the final step is to create a CABasicAnimation that animates the text’s transform. This is going to use the crawl’s current transform for its fromValue, but for the toValue we’re going to make the same rotation then push it back 500 points on the Y axis, pulling it off into space. Through careful testing (read: trial and error), I found a 90-second animation worked best, but again you’re welcome to experiment.
Here’s the final code:
let anim = CABasicAnimation(keyPath: "transform")
anim.fromValue = openingCrawl.layer.transform

let crawlTransformEnd = CATransform3DMakeRotation(0.5, 1, 0, 0)
anim.toValue = CATransform3DTranslate(crawlTransformEnd, 0, -500, 0)

anim.duration = 90
openingCrawl.layer.add(anim, forKey: "transform")
If you run that back on an iPhone XS simulator you should see blackness at first, then the text will appear and continue sliding upwards into the distance – a simple technique, but surprisingly effective.

What did we learn?
OK, so maybe you’re unlikely to want to have 3D boxes or Star Wars text in your apps, but I hope it has at least inspired you to poke around some more and see what else CATransformLayer can do.
I think the key is subtlety: making something fold out in 3D is a really slick effect when used sparingly, and adding perspective to things in your UI can add a little bit of depth. The classic example is Apple’s Cover Flow: it felt really natural to be able to flick through cover artwork using a gesture, and of course it looked great too.
So, try experimenting with the things you’ve seen above, and see what you can make. If you make something cool send me a tweet – I’d love to see it!
BUILD THE ULTIMATE PORTFOLIO APP Most Swift tutorials help you solve one specific problem, but in my Ultimate Portfolio App series I show you how to get all the best practices into a single app: architecture, testing, performance, accessibility, localization, project organization, and so much more, all while building a SwiftUI app that works on iOS, macOS and watchOS.
Sponsor Hacking with Swift and reach the world's largest Swift community!


